12 Ombre Nail Looks for Every Level of Skill Set
French fades, sunset skies, glitter gradients, and more.
Let's start with the most basic style of ombre. This requires little to no skill, other than knowing how to paint your nails. Choose five shades of polish that vary from lightest to darkest for a left-to-right ombre across each finger.
Design by @karengnails
Another easy look is the glitter ombre. Paint your nails in your favorite shade, then apply a glitter-based polish to your tips. Lightly add more product to the middle of your nail, but keep it denser at the ends.
Design by @theillustratednail
For the true gradient look, check out this Instagram video by @ohmygoshpolish. Start with a white base coat and cover the surrounding skin with nail latex to protect from inevitable overspill. Apply your colors—lined up next to each other—on a makeup sponge and dab it onto your nail. Repeat and reapply polish until you receive your desired effect. Finish your nail off with a top coat (which will act as a final ombre-ing tool, melting the colors together once more).
Design by @ohmygoshpolish
The same effect also works horizontally, like this sandy beach look.
Design by @formulaxnail
Or diagonally, in this four-color combo inspired by Instagram's logo.
Design by @amyytran
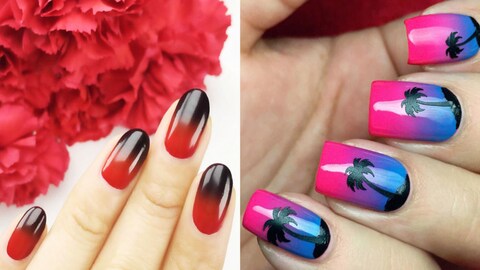
Add black nail stickers for a silhouetted sunset design, throwing it back to old school press-ons.
Design by @allnailseverything
Tape off your half moon to combine a negative nail design with an pink ombre.
Design by @palemoonseattle
Or try another negative half moon, but edge the bottom with gold nail tape.
Design by @ aliciatnails
To get this Lisa Frank design, start with a white base to make your neon ombre brighter. Then use a nail stamp to paint black on top for a flower lattice design.
Design by @clairestelle8
For this muted french fade, you might have to head to the salon for an ombre gel nail.
Design by @yiredelcastillo
If that minimal nail is too bare, get a super kawaii ombre look with crystals and flower embellishments.
Design by @riyathai87